

-
1:15
-
7:03
-
10:32
-
14:26
-
8:31
Get an introduction to Zigbee application layer concepts
Introduction
The purpose of this developer tutorial is to illustrate basic application development on a Silicon Labs EmberZNet SoC platform “from scratch”, meaning that while the ZCL Application Framework (AF) and its assorted plugins are used, no pre-written callback code from the “sample app” scenarios is used. This allows developers to gain a fundamental understanding of how to build an application incrementally, starting from the basic constructs provided by the AF and adding plugins and callbacks to gain increasing functionality.
Synopsis
This multi-part tutorial walks users through a set of pre-written instructions (based on EmberZNet 5.10.1) to create a Zigbee 3.0 On/Off Switch and On/Off Light that can talk to each other via a command-line interface (CLI). Then custom C code is written using the Application Framework API Guide and EmberZNet API Guide as references, extending the generated applications to allow a button press on the Switch node to remotely toggle an LED on the Light node.
Requirements
- Knowledge:
- Level: Beginner to Intermediate.
- Concepts: Zigbee/ZCL basics, C programming.
- Prerequisites:
- Hardware: EFR32MG12 2.4GHz Mesh Networking Kit (P/N: SLWSTK6000B)
- Software:
- Simplicity Studio v4 (with Wireless Products support and latest update packages installed)
- EmberZNet 5.10.0 (Gecko SDK Suite v1.1) or later
- IAR Embedded Workbench 7.80.2 is recommended, but GCC can also be used if supported by your stack (EmberZNet 6.0.0 and later)
Resources
- Z3.0_DIY_Light_and_Switch_setup_instructions PDF (see attachments section below)
- UG102: Application Framework Developer’s Guide
- Ember Application Framework API (and Command Line) Reference for Application Framework V2 (found in SDK folder as HTML, e.g.{STUDIO_V4_INSTALL_DIR}/ developer/sdks/gecko_sdk_suite/ {SDK_SUITE_VERSION_NUMBER}/protocol/zigbee_X.Y/documentation/120-3023-000_AF_V2_API/index.html)
Part 1: Getting Set Up
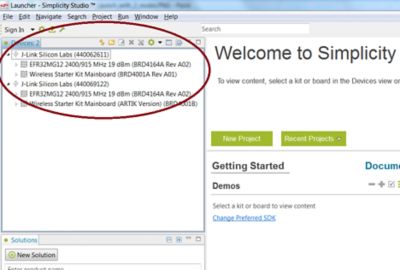
- Start Simplicity Studio v4.
- Make sure at least two nodes are present (over USB or Ethernet) with EFR32MG12-based devices in Devices pane.
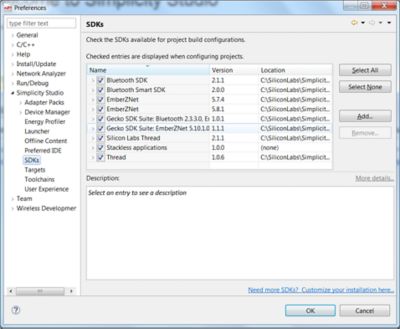
3. Go to Window > Preference > Simplicity Studio > SDKs and ensure the EmberZNet stack version you want to use for this exercise appears in the list and is enabled (checkbox enabled) for usage. After confirming/enabling, click OK.
a. If desired version is not yet installed, go to Help Update Software and install through SDKs tab.
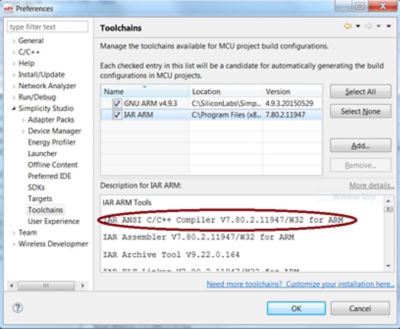
Go to File > Preferences > Simplicity Studio > Toolchains and ensure IAR ARM is listed and enabled and that the proper version is described in the Description area in the bottom of the dialog. (Don’t worry if the Version column in the top half of the Toolchains window shows “0.0.0”. Sometimes Studio can’t determine the package version for the whole toolchain.) Note that the IAR ARM version required for EmberZNet 5.8 and later is IAR-EWARM v7.80.2.) After confirming, click OK. If something’s wrong, use the Add button to add the proper IAR ARM installation into Studio.
Part 2: Create new Simplicity Studio Project and AppBuilder Configuration for Switch
- Go to File > New > Project > Silicon Labs AppBuilder Project, and choose Next.
- Select "ZCL Application Framework V2" and then click Next.
- Select your desired EmberZNet SoC (not Host) version and then click Next.
- Select "Start with a blank application" and click Next.
- In the “Project name” field, input a name for your On/Off Switch project, such as "MySwitch", and click Next.
- In the “Boards” list, ensure the only entry is for an EFR32MG12 radio board such as “BRD4161A” or “BRD4162A”.
- If some other board type is listed, click the small ‘x’ in the upper-right of its listing to remove it.
- To add a new board to the listing, type part of its name (like “EFR32MG12”) in the Search box above.
- Confirm the IAR ARM v7.80.2 toolchain is listed in the toolchains list at the bottom of the dialog, then click Finish.
Watch Video: Silicon Labs Zigbee 3.0 DIY Light/Switch Tutorial: Part 2: Switch Project Init
Part 3: Configure and Build the Switch
- Under the "ZCL clusters" tab, ensure "ZCL device type" is set to "HA On/Off Switch".Why? - This is the most basic Zigbee device type for demonstrating the client side of the ZCL On/Off cluster.
- Under the "Znet stack" tab:
a. In "Network configuration" change Security Type to “ZigBee 3.0 Security”.
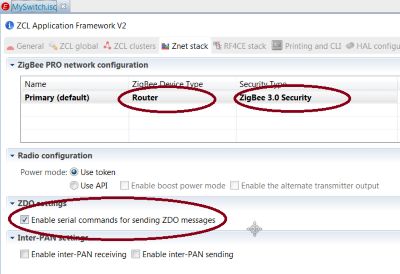
Why? - The legacy Home Automation Security method is now deprecated, and new device certifications for Zigbee 3.0 require Zigbee 3.0-style security, which is a superset of the old Zigbee Home Automation security model. See this KBA for more details about interoperability between ZHA and Z3.0 devices:
b. In “ZDO settings”, enable checkbox for “Enable serial commands for sending ZDO messages”. Why? - This provides some helpful CLI commands for device discovery that we can use to search for available Light devices from our Switch without writing extra code.
3. Under the “Printing and CLI” tab:
a. In the “Debug printing” section, enable the checkbox for “Enable debug printing”.
b. In the same section, under "Cluster debugging", check both columns for On/Off.
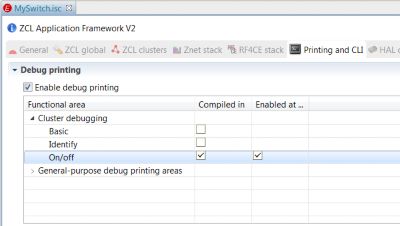
Why? - This will provide additional debug messages on the CLI to tell us about On/Off cluster activity.
4. Under the "HAL configuration" tab, ensure “Bootloader” picklist value is set to “Application”.
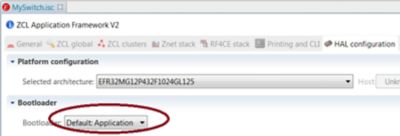
Why? - While prototyping without a bootloader is often easier in development, all devices will need one eventually, so it’s best to get into the habit of making sure you have a bootloader -- specifically, the right one for your product use case and architecture -- loaded onto the target chip when you start developing an application. See UG103.6: Bootloading Fundamentals (https://www.silabs.com/documents/public/user-guides/UG103-06-AppDevFundamentals-Bootloading.pdf) for more context about different kinds of bootloaders.
5. Under the "Plugins" tab, add features by enabling the “Use?” checkbox for the following plugins:
a. Under “EmberZNet Libraries”, enable “Install Code Library”.
Why? - Zigbee 3.0 requirements stipulate that a joining device must support install-code-based joining, where a pre-programmed seed value is used to derive a unique, device-specific key for joining the network. See AN1089: Using Installation Codes with Zigbee Devices (https://www.silabs.com/documents/public/application-notes/an1089-using-installation-codes-with-zigbee-devices.pdf) for more information on this feature.
b. Under “Network Form and Join”, disable “Network Find”. (Network Steering plugin will be used instead.)
Why? - The Network Find plugin uses the legacy Home Automation style of security setup and searching for available networks, and this is not compatible with the “Zigbee 3.0 Security” setting we chose for this configuration, so if Network Find is still enabled as a consequence of the earlier “Home Automation Security” default, we need to disable it to prevent conflict with the Zigbee 3.0-style plugins.
c. Under "Utility", enable “General response commands".
Why? - This allows for basic ZCL Read/Write Attribute Response messages to get picked up by the framework, parsed, and printed to the CLI for feedback, which is helpful in the early phase, when interaction with the app is still primarily CLI-driven, rather than driven by a state machine in code.
d. Under “ZigBee 3.0”, enable “Find and Bind Initiator”, “Network Steering”, and “Update TC Link Key”.
Why? - These plugins provide production-ready implementations of state machines necessary to commission a Zigbee 3.0 device into a network, including the “Network Steering” process and the “Finding and Binding” process. For more details, see the “ZigBee 3.0” chapter of UG103.2: Zigbee Fundamentals (https://www.silabs.com/documents/public/user-guides/UG103-02-AppDevFundamentals-ZigBee.pdf) and the “Commissioning” chapter of the ZigBee Base Device Behavior Specification (document #13-0402 on www.zigbee.org).
Watch Video: Silicon Labs Zigbee 3.0 DIY Light/Switch Tutorial: Part 3.9: Switch Build
6. Save settings via File > Save.
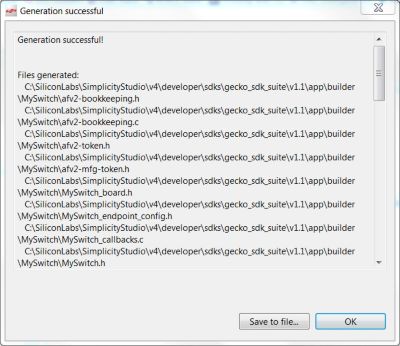
7. Click Generate button in the top right corner. It should complete (several seconds later) with “Generation successful!”.
8. In Simplicity Studio’s Project Explorer pane (to the left of AppBuilder window), right-click on top-level folder for your project (with same name as the project, such as “MySwitch”), and choose Build Project from the context menu.
9. To confirm the build completes with no errors, scroll up in the build console a few lines from the end, and look for “Writing GBL file… DONE”.
Watch Video: Silicon Labs Zigbee 3.0 DIY Light/Switch Tutorial: Part 3.9: Switch Build
Part 4: Load Switch Application to ZigBee Development Board
1. In Devices view, right-click on the debug adapter for your desired Switch node, and choose Upload Application.
Note: There are lots of ways to load firmware to a target chip in Simplicity Studio, but this is the only method that allows you to pick the application and the bootloader firmware at the same time, so you can make sure the requisite bootloader gets loaded.
2. Enable “Erase chip before uploading image” checkbox to prevent the node from using older saved network data.
Why? - Once the EmberZNet stack comes online, all the network parameters are committed to non-volatile memory (NVM), and the AF tries to reuse this data on subsequent boot sequences. However, since we’re beginning a fresh network, you don’t want the system to mistakenly resume an older network before you can set up this one.
3. Click the folder icon next to “Application image path” and browse to the newly created GBL file for your Switch app.
Default path is typically C:\SiliconLabs\SimplicityStudio\v4\developer\sdks\ gecko_sdk_suite\{versionNumber}\app\builder\{Project Name}\IAR ARM - Debug - {ChipVariant}\{ProjectName}.gbl.
4. If a Gecko Bootloader hasn’t been loaded to this device before (which may have been done via the Quick Start Guide):
a. Enable checkbox for “Bootloader image”.
b. Click the folder icon next to “Bootloader image” and browse to the S37 file for the Gecko Bootloader binary. This exercise is designed to work with the “bootloader-storage-internal” or “bootloader-storage-spiflash” examples. Pre-built sample bootloader binaries for testing with development kits can be found in per-chip folders within
C:\SiliconLabs\SimplicityStudio\v4\developer\sdks\gecko_sdk_suite\ {versionNumber}\platform\bootloader\sample-apps.
Note: Eventually, you will want to build your own Gecko Bootloader binary with your desired security features and storage settings, but the pre-built samples are easier to use in early development because they don’t require digitally signed or encrypted images. For more details on the Gecko Bootloader, see UG266: Gecko Bootloader User’s Guide (https://www.silabs.com/documents/public/user-guides/ug266-gecko-bootloader-user-guide.pdf).
5. Click OK to begin the upload process. Ensure it completes with no errors. (Device icon should return to green color.)
Watch Video: Silicon Labs Zigbee 3.0 DIY Light/Switch Tutorial: Part 4: Load the Switch App
Part 5: Clone the AppBuilder Configuration for the Switch as a Starting Point for the Light
Note: You could choose to create the new Light configuration by going back through the steps you did in Part 2 and Part 3, but sometimes it’s useful to use another project as a starting point to save time and avoid missing something.
1. In Simplicity Studio, go to File > Save to save your AppBuilder Switch configuration as an ISC file, such as MySwitch.isc.
2. Go to File > New > Project > Silicon Labs MCU Project (not AppBuilder project), then click Next.
a. In the resulting “Project Setup” dialog, ensure the SDK selection is “Gecko SDK Suite” with the same version as the Switch used, and that the Board/Part matches the target hardware for your Light, then click Next.
b. In the next “Project Setup” dialog, ensure “Empty Program” is selected, then click Next.
c. In the “Project Configuration” dialog, change the project name to that of your Light, e.g. “MyLight”.
d. Uncheck “Use default location” checkbox.
e. Click Browse button and browse to your current Gecko SDK installation (such as C:\SiliconLabs\SimplicityStudio\v4\developer\sdks\gecko_sdk_suite\v1.1), then into the app\builder subdirectory).
f. Click Make New Folder and change the folder’s name to match your Light project name, e.g. “MyLight”.
g. Click OK to exit the browse dialog, and then click Next. (“Link to sources” default selection is OK.) h. De-select any entries for “GNU ARM” build configurations in the Build Configurations window (since we’re only using IAR ARM for this exercise), and then click Finish.
3. Scroll to the Project Explorer tree for your original Switch project, and find its ISC file, e.g. “MySwitch.isc”.
4. Right-click on this ISC file, choose “Copy”.
5. Scroll to the top-level project entry for your Light project, right-click on it, and choose “Paste”.
6. Right-click on the newly copied ISC file inside your Light project, and choose “Rename”.
7. Set a new name for your Light configuration, e.g. “MyLight.isc”, and click OK.
8. Double-click on the newly renamed Light ISC file to begin editing its AppBuilder configuration.
Watch Video: Silicon Labs Zigbee 3.0 DIY Light/Switch Tutorial: Part 5: Clone the Switch Project for the Light
Part 6: Configure, Build, and Load Light application to second node
1. In the Simplicity IDE’s AppBuilder view, under the General, tab, change “Device name” so that it matches your Light’s project name, e.g. "MyLight".
2. Under the "ZCL clusters" tab, change "ZCL device type" to "HA On/Off Light".
3. Under the “ZNet stack” tab, change “ZigBee Device Type” to “Coordinator or Router”.
4. Under the “Plugins” tab, make the following adjustments to the plugins in the noted sections:
a. Common Clusters: disable “Scenes Server Cluster” plugin.
Why? - Some versions of AppBuilder have trouble generating the proper token (NVM) definitions for plugins that require them, which includes the Scenes Server Cluster plugin, but only if those plugins are enabled by default as part of the blank project template. (This can manifest as a missing scenes-token.h file during the build process.) This tutorial doesn’t make use of the Scenes cluster, so you don’t need the plugin code to handle the commands for you, but if you really want to include Scenes cluster support in a new blank project, re-enabling the plugin after disabling it will work around the issue.
b. ZigBee 3.0: Enable “Find and Bind Target”, “Network Creator”, and “Network Creator Security” plugins.
Why? - The “Network Creator” plugins allow the Light to form its own Zigbee 3.0 network for other nodes (like the Switch or even another Light) to join, supporting all the various security models for incoming Zigbee 3.0 and legacy HA devices. The Find and Bind Target plugin allows a Find and Bind Initiator device (like the Switch) to discover and pair to the server-side clusters of the Light, as per Zigbee 3.0 commissioning (discussed in the Commissioning chapter of the ZigBee Base Device Behavior Specification, ZigBee Document 13-0402).
5. Click Generate button; after generation completes, confirm that it was successful, and then click OK.
6. Use Ctrl+S or File Save to save the AppBuilder configuration for your Light for future reference.
7. Right-click on your Light’s project folder in the Project Explorer, and choose Build Project.
8. Ensure that the build completes with no errors. (Warnings are OK.)
9. Repeat steps in Section IV for Light application using a different EFR32 + WSTK target device than your Switch.
Watch Video: Silicon Labs Zigbee 3.0 DIY Light/Switch Tutorial: Part 6: Clone the Switch Project for the Light
Part 7: Starting Debug Communication
1. After successful upload for Light and Switch, right-click on each node in Devices pane and select "Launch console".
2. For each node, Select "Serial 1" tab and press Enter to make sure you get a prompt indicating you are talking to the Light or Switch node. (Prompt should show configured application name from General tab of AppBuilder.)
Why? - The “Serial 1” tab in the Simplicity Studio Console view allows you to interact with the physical serial port (USART0 or whichever UART TXD/RXD pins are routed to the VCOM_TX/RX pins on your board), using the USB-to-serial interface on the WSTK or TCP Port 4901 on the WSTK. This can even be used for custom EFR32-based hardware as long as it connects back to the WSTK debug adapter through the Mini-Simplicity Connector. The “Serial 0” tab represents a “Virtual UART” emulated over the SWO and SWDIO debug pins via the Debug Basic Library plugin and exposed through TCP Port 4900 on the WSTK. For more information about accessing debug interfaces for EFR32 via the WSTK, see AN958: Debugging and Programming Interfaces for Custom Designs, (https://www.silabs.com/documents/public/application-notes/an958-mcu-stk-wstk-guide.pdf).
3. Go to Window > Preferences > Network Analyzer > Decoding > Stack Versions, and set to the EmberZNet version corresponding to the SDK you used to build these applications (or latest available if your version isn’t listed) to ensure captured packets are properly parsed as Zigbee traffic. Click OK to continue after setting this.
Why? - The default Network Analyzer setting of “Auto-detect” can’t always correctly guess the protocol type used in the capture, especially in environments with mixed 802.15.4-based traffic. Also, some non-Packet events emitted by the EmberZNet firmware may be version-specific in their nature, so getting the right stack version for decoding becomes more important.
4. Right-click on Switch node in Devices view, and choose "Start Capture". Network Analyzer will open.
Why? - This allows Simplicity Studio to start gathering Packet events and network transactions via the WSTK using the EFR32’s Packet Trace Interface (PTI) peripheral on the FRC_DFRAME and FRC_DOUT pins. Additionally, if the Debug Basic Library or Debug Extended Library plugins are enabled, the firmware may emit software event traces such as Resets, Asserts, Debug Printfs, and EZSP commands/responses, using the WSTK’s connection to the EFR32’s SWO pin. All of these events are then aggregated in the Network Analyzer during a capture, which can be saved for later use. For more information about debugging features available in the EmberZNet stack, see KBA @ http://community.silabs.com/t5/Proprietary-Knowledge-Base/What-are-the-different-levels-of-debug-in-the-mesh-stacks-and/ta-p/113207.
Watch Video: Silicon Labs Zigbee 3.0 DIY Light/Switch Tutorial: Part 7: Start Capture
Part 8: Setting Up the Network
1. On the Serial 1 console tab of the Light node, enter a command like the following: plugin network-creator form 1 0x5432 10 12
The options here will form a network which is:
(1) – Centralized
(0x5432) – Uses this PAN ID (You can select anything in the 0x0000-0xFFFE range.)
(10) – Starts with a TX power of +10 dBm (You can select any level supported by your hardware, up to +20.)
(12) – Starts on channel 12 (You can select anything in the 11-26 range.)
2. For the Light node, after console prints out "EMBER_NETWORK_UP" on Serial 1, enter the following command to open the network for joining for 254 seconds: plugin network-creator-security open-network
3. On the Serial 1 console tab of the Switch node, within 254 seconds , enter the following to attempt joining: plugin network-steering start 0
Why? - This starts the Network Steering process, which tries different security keys and different masks of channels for joining various configurations of Zigbee 3.0 networks. The “0” parameter tells the plugin to use the standard behavior, as opposed to supplying “1”, which would suppress the usual updating of the Trust Center Link Key after joining completes successfully. Because different security keys are tried during this process, you may see some join failures (“EMBER_JOIN_FAILED” status printed) prior to seeing the successful joining attempt.
4. If joining is successful, console for Switch will print "EMBER_NETWORK_UP" on Serial 1, and you should see “Association” and “Transport Key” transactions appearing in the Transactions view of the Network Analyzer (as illustrated in the video below). If successful, proceed to next section. If not successful, repeat steps 2 and 3. If you are doing this in a classroom setting with others at the same time, you should make sure you joined your own network (based on PAN ID) and not one of your neighbors’.
Note: Other 802.15.4 traffic may be present on the same channel, so unrelated events/transactions may appear in Network Analyzer, including traffic for which you don’t have decryption keys. If a warning appears about traffic that you are unable to decrypt, just click OK and move on, ignoring the other traffic. (You can filter it out later.)
Silicon Labs Zigbee 3.0 DIY Light/Switch Tutorial: Part 8: Clone the Switch Project for the Light
Part 9: On/Off Toggle
1. On Serial 1 of Switch node, enter the following:
zcl on-off toggle
send 0 1 1
2. Confirm sending of “ZCL: Toggle” and “ZCL: Default Response” between Switch and Light in Network Analyzer’s Transactions view. (Note that the LED on WSTK won’t toggle yet because we haven’t added code for that.)
3. Under the Live capture tab of the Network Analyzer, highlight “ZCL: DefaultResponse” and check in Event Detail panel on the right for “Status: SUCCESS (0x00)” under the “Zigbee Cluster Library” section.
4. Confirm “Toggle” message is printed on Serial 1 of Light. Type the following CLI command to print attribute table and verify that attribute 00 for On/Off cluster (0x0006) changes when toggle is received: print attr
5. Refer to the Ember Application Framework Command Line Interface (CLI) documentation (found in HTML at {GECKO_SDK_SUITE_DIR}/protocol/zigbee_X.Y/documentation/120-3023-000_AF_V2_API/index.html) for additional CLI commands that can be used to control the Switch and Light via the AF CLI. You can also type “help” on the CLI to get a list of supported commands, and any incomplete commands will trigger the help syntax for those commands.
Watch Video: Silicon Labs Zigbee 3.0 DIY Light/Switch Tutorial: Part 9: Toggle Light With CLI
What’s Next?
In future segments of this tutorial, we’ll examine how to make the Toggle commands actually toggle a physical LED on the WSTK for the Light, and we’ll look at how to transition from CLI-driven Toggle commands at the Switch to button-driven commands initiated by push-buttons on the Switch WSTK.
Resources
Required Hardware:
EFR32xG24 Wireless 2.4 GHz +20 dBm Radio Board
(xG24-RB4187C)