

Z-Wave Application Framework
The purpose of the Z-Wave Plus Application Framework is to facilitate the implementation of robust Z-Wave Plus Compliant products.
The Z-Wave Application Framework:
- Makes it simpler to Develop firmware for new Z-Wave products and devices.
- Provides sample code for many common devices, plus a modular library of robust, field-tested code that can be readily re-used.
- Helps eliminate errors and minimizes the need for custom coding.
As a result, the process of creating new Z-Wave applications is streamlined, typically taking less than a week or two for most new devices.
Getting Started with Z-Wave
The Z-Wave SDK comes with the Application Framework for fast prototyping of your application. After downloading the SDK, decompress the SDK archive and then move to: SDK > ProductPlus > MyProductPlus. This directory contains necessary scripts to generate a sample Z-Wave application.
Application Framework included for fast application prototyping (Sample Code Libraries)
- Encapsulate the peripherals
- Service functions for the Application (Timers, ….)
The Application Framework delivers Command Class modules that can be reused between applications.
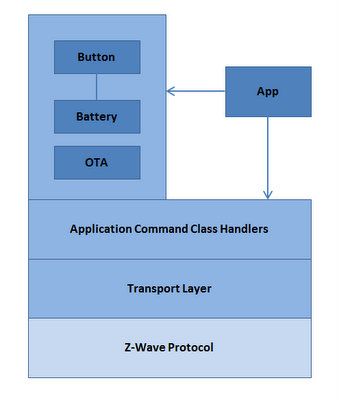
The framework provides a number of modules:
Transport Layer The Transport Layer handles security, fragmentation of long payloads, delivery of bundled commands, etc.
Application command class handlers The Application command class handlers, handle parsing and frame composition for the application.
It also handle mutex protected transmit buffers.
Utils Utils provides helper modules for I/O handling, battery monitoring and firmware.
Application Framework is split in two folders /ApplicationCommandHandlers/ and /ApplicationUtilities/.
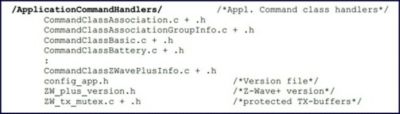
/ApplicationCommandHandlers/
/ApplicationCommandHandlers/ contains command class modules. All command class modules share a protected transmit buffer provided by the ZW_tx_mutex module.
ZW_tx_mutex module implements two transmit buffers, one for request calls and one for response calls.
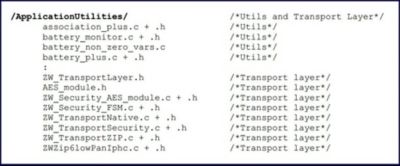
/ApplicationUtilities/
/ApplicationUtilities/ contains utility modules and interfaces to the Transport layer.
Some of the modules are used for simple MMI-setup such as button and LED handling. Other modules as association_plus, battery_monitor, battery_plus and ota_util are more complex utility modules which interface to command classes and the client application.
The last group is the Transport layer which takes care of transport; secure as well as non-secure.
The Transport layer API interface is identical for secure and non-secure transport.
From Framework to Z-Wave Product
The device type must match the type of product. Completing the certification form will outline all requirements for the product.
Select all implemented Command Classes
Command Class Specification; Z-Wave Command Class Specification
Select chip or module to use.
| Specifications | |
|---|---|
| Hardware | 500 Series Integration Guide |
| Software | Working in 500 Series Environment User Guide |
Setting up the Environment
The first step in Z-Wave development is setting up the development environment. To start Z-Wave application development you need:
- Windows-based PC
- Z-Wave Software Development Kit (SDK)
- Keil Compiler Version 9.54a
As Keil compiler and Z-Wave tools are compatible with Microsoft Windows OS, we highly recommend using a Windows-based PC.
Start with downloading the latest Z-Wave SDK. Unpack the downloaded file.
The next step is to setting up the development environment.
To learn more about setting up the development environment refer to the 500 Series Environment User Guide.
Step-by-step Guide to Generate Z-Wave Project
For this example, we assume that Keil compiler version 9.54a is located at C:\KEIL\C51 and Z-Wave SDK is located at C:\SDK\.
- KEILPATH= C:\KEIL\C51
- TOOLSDIR= C:\SDK\TOOLS
Open a command prompt (DOS box) in the relevant sample application directory
- Like C:\SDK\ProductPlus\MyProductPlus
Command line build by mk.bat use “mk help” to get more detail
- smk "BOOT=BOOTLOADER_ENABLED" "BOARD=ZM5202" "FREQUENCY=EU" "CHIP=ZW050x"
Use mk.bat to generate µVision project for Keil IDE
- Open a command prompt (DOS box) in the relevant sample application directory and adding “UVISION=1” to command MK.
- mk "BOOT=BOOTLOADER_ENABLED" "BOARD=ZM5202" "FREQUENCY=EU" "CHIP=ZW050x" "UVISION=1"
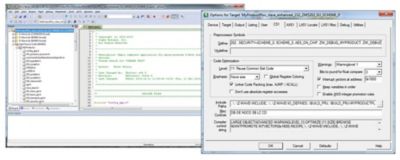
Setting up ZW_DEBUG in the Project
- Right-click on the top-level project or press ALT+F7
- Select C51 Tab
- Add Defines: ZW_DEBUG, ZW_DEBUG_MYPRODUCT
- Select the Device Tab and select ZM5202 (used in this example)
- Click OK and rebuild the project
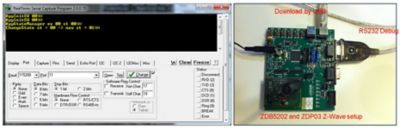
Connecting the Debug port
- Mount the ZDB5202 on the ZDP03
- Connect the ZDP03 USB (J1) and RS232 (J12)
- Download the .hex-file using the Z-Wave Programmer: MyProductPlus_slave_enhanced_232_ZM5202_EU_SCHEME_0.hex
- Debug information can output on a terminal program at 115200 baud
Product Specification Proposal
Z-Wave Plus Framework Version 1.x
- Notification Command Class v4
- Software based slow timer
Z-Wave Plus Applications
- Sensor PIR App (Battery operated best practice) – MRD Request
- Sensor PIR App (Basic CC control, Lifeline and AGI)
Introduction to the OutdoorLamp
- Device type = On/off Power Switch
- Role type = Slave Always On
- Push button
- PIR Sensor (HW I/O)
- Relay control (HW I/O)
- Binary Switch CC support
- Firmware update support – OTA
- Secure Binary Switch CC
- Z-Wave Plus Certifiable
- External interrupt support