

ZGM230-DK2603A
MSRP $64.00
MSRP $64.00
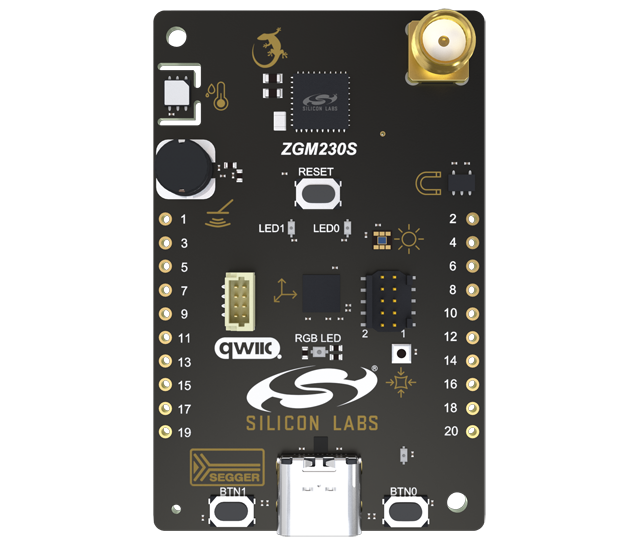
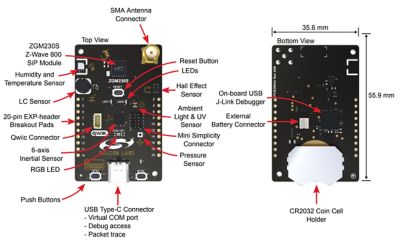
OVERVIEW
Kit Contents
- BRD2603A - ZGM230s +14 dBm Dev Kit Board
- ANT SS900 - 868-915 MHz Antenna
Kit Features
- Sensors
- Temperature and Humidity sensor
- Ambient light sensor
- LESENSE metal detector LC-sensor
- Pressure sensor
- Hall effect sensor
- 9-axis inertial sensor
- User Interface
- 2x Buttons (w/ EM2 wake-up)
- 2x LEDs
- 1x RGB LED
- On-board Debugger
- J-Link Pro
- Packet Trace (PTI) over UART
- Virtual COM with HW Flow Control
- Power-save Features
- Controllable and separate power domain(s) for sensors
- Expansion headers for easy I/O access
GETTING STARTED
Get up and running quickly with the Z-Wave 800 Dev Kit with Unify Portable Environment
For detailed instruction please use: QSG185: Z-Wave 800 Dev Kit Quick-Start Guide with Unify
Requirements
- At least two ZGM230-DK2603A Dev Kits, one for Controller and one for end node
- Coin cell battery or USB-C cable (not included)
- USB-C cable for Controller (not included)
Step 1: Unbox Z-Wave 800 Dev Kit
- Remove BRD2603A from the box
- Supply power to board:
- Insert a battery in the coin cell battery holder on the bottom of the board or plug in a USB Type-C cable.
- BRD2603A comes with pre-flashed Unify SDK Z-Wave Controller
- Connect the first BRD2603A board ( “Controller” ) to computer via USB
Step 2: Download & Run Unify Portable Environment
- Install and run Unify portable environment
- Enter URL in Browser to launch Unify GUI
Step 3: Prepare an End Device
- Connect the second BRD2603A to computer via USB
- Find and flash the desired sample application to BRD2603A
- “Switch On/Off” or “Multilevel Sensor”
- Read the DSK value needed for inclusion
- Include the End Device to the Z-Wave network
- Experience the power of Z-Wave devices and demo applications
- For more instructions, please refer to Tech Docs tab, or look at the Collection of Recommended Resources for Z-Wave Development
TECH DOCS
SOFTWARE & TOOLS
COMMUNITY & SUPPORT
Knowledge Base Articles
Browse our knowledge base articles for information about specific products.
User Forums
Browse technical questions, share your ideas, and learn more about our latest solutions.
Z-Wave Certification
Certification of devices to Z-Wave standards is required.
Questions? You're in the Right Place.
Silicon Labs has an active, knowledgeable user community of engineers and developers that are enthusiastic about solving problems.